So this is the second tutorial on how to create tree within the UDK pipeline.
After we create our tree in Speed tree program, we just need to save it and then launch the Speed Tree Compiler.
Once we launch it you’ll be facing a menu asking you to load some trees. Add the tree you’ve just created and click next.
Then you have to define your export settings. Be sure to pick an appropriate folder.
- Settings
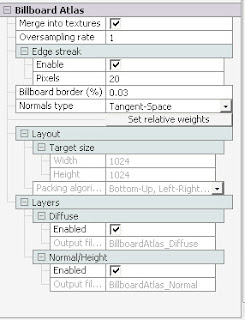
I chose to create only 2 billboards for my tree but the default settings are just fine. For the sake of the tutorial I choose to create a billboard which will be replacing the tree in game when the camera is far away. Pretty neat feature but it doesn’t always work. OR maybe I haven’t found or to properly set it up.
You can create overhead billboard also if your character is flying over the trees. I leave you choose what suit best your needs.
Click next and then your see two your texture in two different folders. The fist one is the leaf and the second one the billboard. Don’t worry if nothing appears in the second one the billboard will be out put properly.
Be sure to change the prefix name if you have more than one tree in the folder.
Set the other parameters to fits your tree like the target size for instance. I did merge my billboard to the texture. But you can keep into another file.
Then my Tree is ready to compile. Press F7 or the start button compilation in your compilation menu.
The open up your UDK editor and import the all components to the appropriate package.
You need to create the material first and then load them into the speed tree editor
So first pick the bark texture right click create a new material
Open it in the material editor in left clicking twice on the newly created material. For those familiar to this process just skip to the tree editor.
Connect the material to the diffuse channel
Select the normal map tree bark and with the texture highlighted right click in the material editor and select new texture sample. I usually set the compression of my normal mapping to uncompressed. Then connect the normal mapping to the normal input. Valid your change and close the material editor.
Repeat the process for the leaf and the leaf mesh, if you have one. The leaf mesh can be the collision model you add into the speed tree and export along. For this example I used a Rock I found in the apricot game made with the blender game engine. The assets are free of use so if you are looking for a grass or a rock you might want to check this game.
Arrange your shader like in the picture and set your blend mode to BLEND_MASKED.
Valid and close the material editor.
Open the speed tree editor and the right just add the texture corresponding. The branches go with the bark material, the leaf mesh with the corresponding texture. Assign the leaf card, the card and the billboard with the leaf material.
You should end up with something like that.
Then just drag and drop your tree onto the level.
If you want real-time shadows, just press F4 and under the speed tree panel look for lightning and uncheck use precomputed shadows.
-


Thanks :)
ReplyDelete